Create a Report from a View

You can export and print a report from any view. In this example we’ll create a report of students who are not enrolled, so that personal contacts can be made.

  1. At the top, under Menu, click Programs.

Note: Select the program you want if more than one option is available.

  1. At the top, click Run Report, and then select Not Enrolled.

Note: Some reports have options for all students, seminary only, or institute only.

  1. At the top of the report, click the Export button, and select CSV (comma delimited), Excel, or Word, depending on which program you have.
  1. After you export the report, delete any information not needed. For example, you may want to keep only the name and phone number or the name and address.
  1. Print the list.

Filtering Select Reports

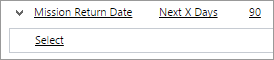
Some reports show potential students within the last 90 days. On these reports, you can use the Edit Filter button to change the number of days to display. For example, you can view returned missionaries for 365 days or within the last year. Or you could view new converts from the past year versus the past 90 days. The reports with this added feature are:

  • Converts
  • Missionaries
  • Move-ins
  • New Potential
  1. At the top of the Programs page, click Run Report. Click the report you want, such as Missionaries.

  1. At the top of the report, click Edit Filter.

  1. On the first filter, "Mission Return Date," change 90 to the number of days you want the report to cover, such as 365.
  1. At the bottom, click Run Report. The report will be generated again.
  1. To export the report, click the Export button at the top. Click CSV (comma delimited), Excel, or Word, depending on which program you have.
  2. After you export the report, delete any information not needed.
  3. Print the list.


© 2015, 2016 by Intellectual Reserve, Inc. All rights reserved. English approval: 3/16. PD50036191